Wednesday, 5 April 2017

1/6 Scale Dragon Sherman Tank Build - Interior

Changing pace here.  Now that the suspension is complete, and i am just letting the paint dry on the wheels (more on that later) its time to switch things up a little.

With this build I plan on doing a full interior.  On my 1st build, i did a partial interior including the transmission housing, seats,controls and turret basket etc.  It turned out acceptable and looks pretty cool when looking though the hatches, but with this one I want to go all out.  

I am not going for 100% accuracy, I am going for the "look" as its a daunting task to start with, and with so many variations it will be hard to duplicate 100%. 

All interior build photos etc will be on this page so check back often for updates.

Photos from my 1st Tank build ...


Interior instruments panel, and radio


  interior escape hatch, seats and transmission section (scratch built)


View looking in, from the commanders hatch.......


Now on to this built.  Like my first build I am going to be making the turret basket, the transmission section and all the bins and storage racks.  A lot of the main parts I have opted to go with excellent parts from ECA.  
Drivers & co drivers seats
Insterment panel
Radio
Escape Hatch
Transmission extension housing
Control levers
Rear firewall radiator section

So although there are a number of "bought parts", there is still a ton of scratch building to do.
1st on my list is the transmission housing.  I didn't take a lot of photos of the build process but these pictures should give you an idea of what i have done.  I started with a 3" diameter pvc pipe.  Adding styrene and a paint can cap here is where I am currently at...Still more parts to add including casting material (as the housing is a cast part), brake controls, etc


To show size...looks about right, and once painted should look good sitting inside the tank next to the ECA parts.


More work has been done since the last update and the transmission housing is now complete. Or as complete as I can make it.  I know its not 100% accurate, but once inside the tank it will do the job and look the part.  Here are a few updated pictures of it.


 primed and painted...


Some of the bolt detail...


It is amazing what a few bolt heads can do for the "look" of something like this...

April 12/2017
Some more progress on the interior. Here is the firewall or bulkhead -fighting compartment side. Still need painting and weathering to do before I glue it in place, but its about 90% done. I have included the plan I used to work from.  Only thing I wish I had was a nice punch set for making round items...would have come in handy for knobs, dials and such. I did have to use a little creative licence due to size and making things fit...but once painted it will look the part.
Still deciding if I will detail the engine side (since I have no engine to go in there) its a lot of work for nothing if I can procure or make a suitable motor to sit in there a look the part.


Did some more work on the tank today.  Painted the firewall and created the "little Joe" generator.  It was my 1st attempt at making something like this and I am happy with the result. once painted it will look the part.
  The scan I was using was an "early" version.  It had a heat duct off the rear of the generator, I created this part as well but not sure if I like the way it looks.  I might just install the gen without the duct. Here are a few pictures..including the scan.


Looking at it from the back, on the rear it has the carb, choke fuel line etc.  I add the carb and choke section as well as the fuel line.
It took most of the afternoon to build this, amazing how much time these little projects take up...


25 April 2017
Sorry for the long delay in updating this blog.  I have been neglecting the tank a bit as....One of the other things I do is commission builds (kits or Scratch builds) for vehicles and tanks. (so if you are looking for something ..hint hint).  

Anyway, I have been commissioned to build a German Adler 13 armoured car.  Its a pretty complicated scratch build as there is not a whole lot of information on it.  I am currently working from a 1/35 scale model and scaling up.  Here is what it looks like and where I am at in the build process...

 Still have a long way to go but its getting there...a something a little different as well.


Anyway, back to the tank...
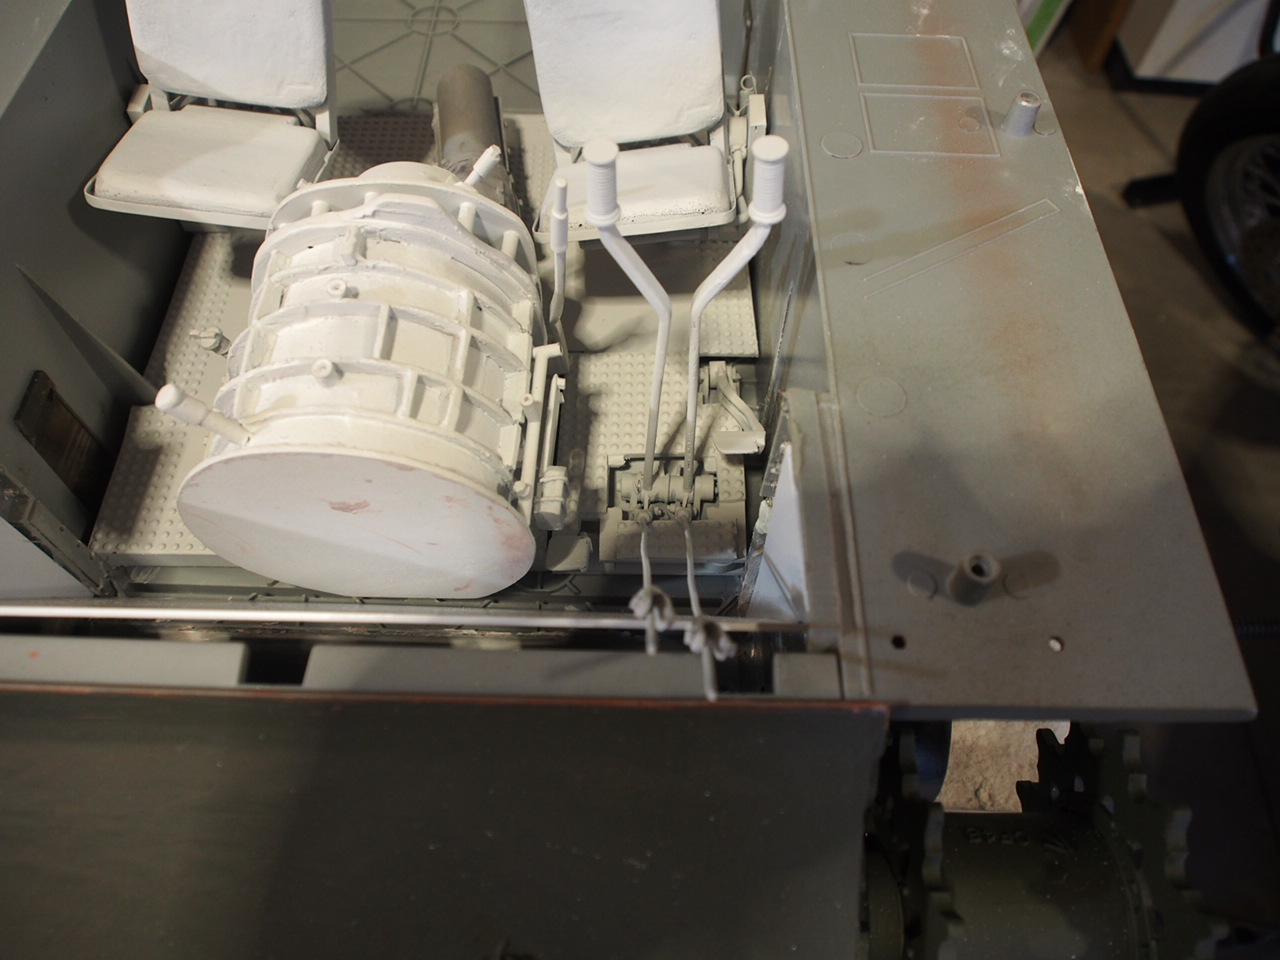
Before I start on commission project, I was able to get the controls, seats and floor completed.  The seats still need to be glued to the sides of the hull, but that won't happen until I get the transmission housing/wall completed.  Speaking of the transmission, after completing the 1st one, I realized its too big.  So I had to make a second one...now the 1st one could still work and look good, I felt it was just a bit out of scale.  Here are a few photos of the interior as of this date.  Little Joe generator has been painted, rear firewall in place and painted and the hatch section for the ammo is done.  Still have to run all the wires, dash, blowers transmission section etc etc...

 Second transmission build, a little smaller over all...
 Interior with 1st transmission build, using East Coast Armoury control kit, fantastic but complicated kit


The handles are fantastic and the whole thing moves like it should


 Rear firewall, Little joe generator painted...

  Interior section with ammo storage bins in place...coming along


More to follow....


Thursday, 30 March 2017

1/6 Dragon Sherman Tank build - Part 5 (c): Final suspension assembly

So yesterday the weather was nice enough I was able to get the lower hull outside to prime and paint.
I didn't take a lot of pictures but one tip about painting, if you are using spray paint, try and make your first 2 coats as light as possible.  Do not try and cover the whole model, just give it a light mist.  This allows the paint to stick against the model really well.  I have noticed that since I started doing this the paint adheres much stronger, and doesn't chip or scratch off as easily.

Here is the completed lower hull with paint.  I just use Krylon paint.  Red oxide primer first, in total about 4 coats with the first two just misting. I taped off the area where the suspension attaches first to allow for the glue to attach better.  This will get touched up after the suspension is attached.


Here is the first set of suspension attached.  The stock section kind of snaps into place, mine made a click sound when I put them on.  I then drilled 4 holes where the bottom section sits, and using #5 bolts attached the suspension.  The stock set up uses a small screw from the inside of the hull, not very strong at all.  I perfer the 4 bolt method.  I also used CA glue on the housing for added strength.


Wednesday, 29 March 2017

1/6 Dragon Sherman Build- Part 5 (b): Lower Hull completion

In the last post I went though some of the mods to the lower hull to make it more accurate, detailed and complete.  In this segment we finish the lower hull adding all the little things that make the difference between a average model to a museum quality piece.

The biggest area that needs attention in the lower hull is the rear of the hull. Dragon supplies a large plate which is suppose to be a cover and extension.  It really don't have any detail nor does it fit very well, plus it interferes with the exhaust vent.

Instead of using the stock item, I decided to use the rear hull extenders from ECA.  I have used this before on my 1st tank and it worked excellent. This item fits well and is accurate.  It also allows the exhaust vent section to fold up and into it which again is how the real thing works.


Stock plate that is suppose to be a lower hull extension?


Here is the ECA part installed, any gaps filled...


I also created my own rear tow eyes. The stock ones are not very accurate or thick enough. You can have either 4 arms sticking out or two. I choose to use the larger 2 style.


Rear idler mounts attached, I used #5 bolts to hold them in place, just like the real tank.

 Another item some people miss is the little Joe generator, exhaust.  The Dragon supplied piece is ok, but is not hollow and has some casting marks on it. I decided to create my own out of stryene strip. Whether you use the stock one or make your own, make sure you add the little protective cover as its there on the real one.  The cover is there to protect the exhaust from rocks etc thrown up by the wheels/tracks.


You can either have it running straight out or with a little bend in it pointing downward.

And the last thing added prior to primer and paint is the transmission housing bolts which are missing from the model.  There is 10 bolts per side.  I used #6 hex bolts.


Here is the rear section completed with the following additions:
ECA tow hitch extender, Modified Dragon hitch mount;
ECA Rear Idler mounts, real metal bolts #5's;
ECA hull extension kit;
ECA Rear engine Hatch;
Stock exhaust stacks reworked, casting material etc;
Scratch made tow eyes;
Transmission housing bolts (10 per side);
Sponson access caps (1 per side);
Little Joe Exhaust with protective cover ; and
weld lines.

For weld lines, I use milliput and a little metal tool to create the marks. The Sherman has smoother welds then most, so a real pronounced scalp shape is not necessary although looks good when painted. Weld lines run along the inside of the sponsons, and once the upper hull is in place, weld lines will be place on the outer side as well.  Also along the bottom of the rear plate.


Now the lower hull is complete and ready for paint. Due to the size I need to paint outside so right now I need to wait for the weather to get nicer.  I will also add a little weathering to the under side.  Again, its starting to get heavy so better to do this now then try and do it once the tank is built.

Next post....Final suspension assembly.